Introduction
What is in this tutorial?
This tutorial describes the process of downloading, compiling, and running NU-WRF (development version) for four different and representative workflows:
Basic: Based on WRF ARW.
WRF-LIS: The recommended non-chemistry NU-WRF workflow (LIS MERRA forcing).
Chemistry: The recommended chemistry (non-LIS) NU-WRF workflow.
SCM: The Single Column Model NU-WRF workflow (with LIS coupling).
Special instructions
All workflows are designed with pre-defined settings [1], including datasets. Workflows are not guaranteed to work if you deviate from the prescribed instructions. So, please refrain from editing the inputs unless you know what you are doing.
It is assumed that users are running on Discover or Pleiades using the bash shell. However, the steps described here should work under other shells.
Useful links
Community ARW User Guide https://www2.mmm.ucar.edu/wrf/users/docs/user_guide_v4/v4.4/contents.html
Community WRF ARW Online Tutorial http://www2.mmm.ucar.edu/wrf/OnLineTutorial/index.php
Documentation for using Discover and other NCCS systems https://www.nccs.nasa.gov/nccs-users/instructional
Documentation for using Pleiades and other NAS systems http://www.nas.nasa.gov/hecc/support/kb
NOTE: The details for building the software on Discover and Pleiades are automatically handled by NUWRF’s build scripts!
Setup
Before starting any workflow there are a few steps that must be completed:
Copy or checkout the NU-WRF code.
Build the NU-WRF executable components.
Set some environment variables.
Copy the code
> cp /discover/nobackup/projects/nu-wrf/releases/stable/<tarball> /some/path
On PLEIADES:
> cp /nobackupp8/nuwrf/releases/stable/<tarball> /some/path
> tar -zxf nu-wrf_v11-wrf44-lisf74.tgz
Clone the code
The code can also be obtained from its Git repository (an account is required for access and you may need to upload an SSH key):
> cd /discover/nobackup/user_id/
> git clone --recurse-submodules git@git.smce.nasa.gov:astg/nuwrf/nu-wrf-dev.git
First of all, note the use of the –recurse-submodules option. That option guarantees that any submodules included with the code distribution are retrieved during the cloning step. Once such submodule is noahmp used in WRF/phys. Using Git is more advantageous. Once you clone the repository you have a “complete repository” in your local work area. Now you can change the files and commit your feature branches using Git’s branching capabilities. Other developers can pull your changes from the repository and continue working with the improvements you added to the files.
Build NU-WRF
> export NUWRFDIR=/discover/nobackup/user_id/nu-wrf
> cd $NUWRFDIR
> ./build.sh wrf,wps &
That will print some setup information and will run the build in the background (so, just press Enter to get back to the Unix prompt). Build information will be saved in a single make.log file. To view the progress of the NU-WRF build you can run:
> tail -f make.log &
The build will take about 1-2 hours, so please be patient. If the compilation fails then you can view the make.log file to check what went wrong.
Build NU-WRF
For the other workflows, use the following commands. WRF-LIS workflows:
> ./build.sh wrf,wps,lis,ldt,lisWrfDomain,sst2wrf,geos2wrf &
Chemistry workflow:
> ./build.sh chem,wps,lis,utils &
SCM workflow:
> ./build.sh ideal_scm_lis_xy,wps,lis,ldt,lis4scm &
For more information about the NU-WRF build system run build.sh without arguments:
> ./build.sh
Build NU-WRF
After compilation - assuming there are no errors - several executables will be created. Some important executables are:
::
WRF executables:
$NUWRFDIR/WRF/main/real.exe $NUWRFDIR/WRF/main/wrf.exe
WPS executables:
$NUWRFDIR/WPS/geogrid.exe $NUWRFDIR/WPS/metgrid.exe $NUWRFDIR/WPS/ungrib.exe
For example, to see the names of all the executables created with an exe extension run:
> find $NUWRFDIR -name \*.exe
Environment variables
We already set NUWRFDIR, but we need two more variables.
Select a directory for running the model and set it equal to the RUNDIR environment variable. For example:
> export RUNDIR=/discover/nobackup/user_id/scratch/basic_workflow
Make sure you create RUNDIR outside of NUWRFDIR.This is useful when switching between NU-WRF versions or for updating to new changes.
Finally, set the PROJECTDIR environment variable:
> export PROJECTDIR=/discover/nobackup/projects/nu-wrf
Please note that these variables (NUWRFDIR, RUNDIR, PROJECTDIR) are used in all workflows.
Basic Workflow
NU-WRF basic workflow (similar to WRF ARW).
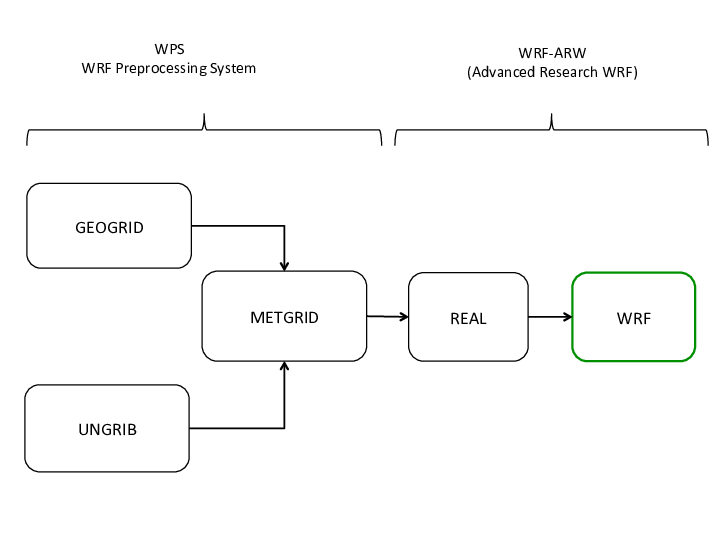
Note that GEOGRID and UNGRIB are independent of each other so you may choose to run one or the other first.
Required files for basic workflow
Copy the basic workflow files to RUNDIR:
> cp -r $PROJECTDIR/tutorial/basic_workflow/* $RUNDIR

Where:
common.reg : shared script with settings used by other scripts.
*.reg : scripts to run pre-processors and model.
namelist* : namelist files required by executables.
data/ungrib/* : GRIB atmospheric data for initial conditions used by UNGRIB component.
Note: All workflows described in this tutorial are part of a small database of test cases used for NU-WRF regression testing. Such tests are executed using the reg script located in scripts/python/regression and can be used to generate/setup the files in each testcase (hence the reg extension of the script files). For more information see section 7.
Required script changes
> cd $RUNDIR
Use your favorite editor to edit common.reg and change the values of NUWRFDIR and RUNDIR using the values set earlier.
# *** Please make sure these settings are correct ***
# NUWRFDIR specifies the location of the NU-WRF source code
NUWRFDIR=<CHANGE THIS>
# RUNDIR specifies the location of the temporary run directory
RUNDIR=<CHANGE THIS>
You may need to edit all the .reg files’ account information and other settings. However, if you belong to group s0492 then the scripts should work without any modifications.
Change account to appropriate SBU charge code:
#SBATCH --account s0942
ntasks is  the number of nodes, -mil runs on Milan nodes:
#SBATCH --ntasks=16 --constraint=mil
Uncomment and set according to your needs and privileges:
##SBATCH --qos=high
Uncomment (if desired) and substitute your e-mail here:
##SBATCH --mail-user=user@nasa.gov
A note about namelists settings
The length of the simulations is specified in the namelist files:
In namelist.wps the length is determined by start_date and end_date
In namelist.input look for start_ and end_ fields.
The dates in both namelists must be consistent.
The workflow is designed to work as-is. However, if you want to run for different dates:
You must get the corresponding atmospheric data for initial conditions.
You may need to modify the namelists. For example in namelist.input, make sure end_day - start_day = run_days.
For any other changes please refer to the user’s guide.
GEOGRID
GEOGRID interpolates static and climatological terrestrial data (land use, albedo, vegetation greenness, etc) to each WRF grid.
Input: namelist.wps
Output: For N domains (max_dom in namelist.wps), N geo_em files will be created.
Before running GEOGRID ensure your domain is in the right location. To do so run plotgrids_new.ncl
> module load ncview
> ncl $NUWRFDIR/WPS/util/plotgrids_new.ncl
This is where you would edit namelist.wps to modify the domain information. Now run GEOGRID:
> cd $RUNDIR
> sbatch geogrid.reg
When done, check for the “Successful completion” string in the file geogrid.slurm.out. geogrid.log.nnnn (nnnn is the cpu number) files will also be created for tracking run failures or debugging.
UNGRIB
UNGRIB unpacks GRIB1 or GRIB2 files that contain meteorological data (soil moisture, soil temperature, sea surface temperature, sea ice, etc) and writes specific fields in a WPS intermediate format.
Input: namelist.wps and GRIB input data.
Output: Several FNL* files corresponding to the number of intervals (interval_seconds) in simulation length (start/end dates).
Notes:
- The GRIB input is referenced in the run script, ungrib.reg: ./link_grib.csh data/ungrib/fnl_*
The UNGRIB output (FNL) is determined by the settings in the WPS namelist (namelist.wps).
makes use of Vtables that list the fields and their GRIB codes that must be unpacked from the GRIB files.
To run:
> cd $RUNDIR
> ./ungrib.reg
METGRID
METGRID horizontally interpolates the output from UNGRIB to the WRF domains and combines it with the output from GEOGRID/UNGRIB.
Input: namelist.wps, UNGRIB output, geo_em* files.
Output: Several met_em* files corresponding to the number of intervals (interval_seconds) in simulation length (start/end dates).
To run:
> cd $RUNDIR
> sbatch metgrid.reg
When done, check for “Successful completion” string in the file metgrid.slurm.out. metgrid.log.nnnn (nnnn is the cpu number) files also be created for tracking run failures or debugging.
REAL
REAL vertically interpolates the METGRID output to the WRF grid, and creates initial and lateral boundary condition files.
Input: namelist.input, met_em* files, geo_em* files.
Output: wrfinput* files (one for each domain), wrfbdy_d01.
To run:
> cd $RUNDIR
> sbatch real.reg
Check real.slurm.out for run completion. If necessary check the real_logs directory for real.rsl.out.nnnn and real.rsl.error.nnnn files.
WRF
This program will perform a numerical weather prediction simulation using the data from REAL.
Input: namelist.input, wrfinput* files (one for each domain), wrfbdy_d01.
Output: wrfout* files (one for each domain).
To run:
> cd $RUNDIR
> sbatch wrf.reg
Check wrf.slurm.out for run completion. If necessary check the wrf_logs directory for wrf.rsl.out.nnnn and wrf.rsl.error.nnnn files.
Post-processing on Discover
Using NCVIEW:
> module load ncview
> ncview <filename>
Post-processing on Discover
Using RIP (NCAR graphics). Submit the rip job:
> cd $RUNDIR
> ./rip.bash # (or use sbatch)
> idt filename.cgm # Substitute actual filename

rip.bash will run ripdp_wrfarw and rip to generate NCAR Graphics cgm files.
idt is a NCAR Graphics executable in $NCARG_ROOT/bin - where $NCARG_ROOT is

$PROJECTDIR/lib/sles12/ekman/intel-intelmpi/ncarg

Sample RIP plot specification tables are in $NUWRFDIR/scripts/rip and are looped through by rip.bash

See http://www2.mmm.ucar.edu/wrf/users/docs/ripug.htm for info on customizing plots with RIP.
Minor changes to rip.bash may be necessary.
Post-processing on Discover
https://www2.mmm.ucar.edu/wrf/users/docs/user_guide_v4/v4.3/users_guide_chap9.html
http://www2.mmm.ucar.edu/wrf/users
Adjustments for Pleiades
On Pleiades set PROJECTDIR to:
> export PROJECTDIR=/nobackupp8/nuwrf
Revise all the *.reg files and edit as needed. The scripts should work with minor modifications - if any at all, but make sure you check the following anyway:
Change s0942 to the appropriate SBU charge code:
#PBS -W group_list=s0942
Change if you want to change number of nodes and nodes:
#PBS -l select=6:ncpus=16:mpiprocs=16:model=san
Set according to your needs and privileges:
#PBS -q devel
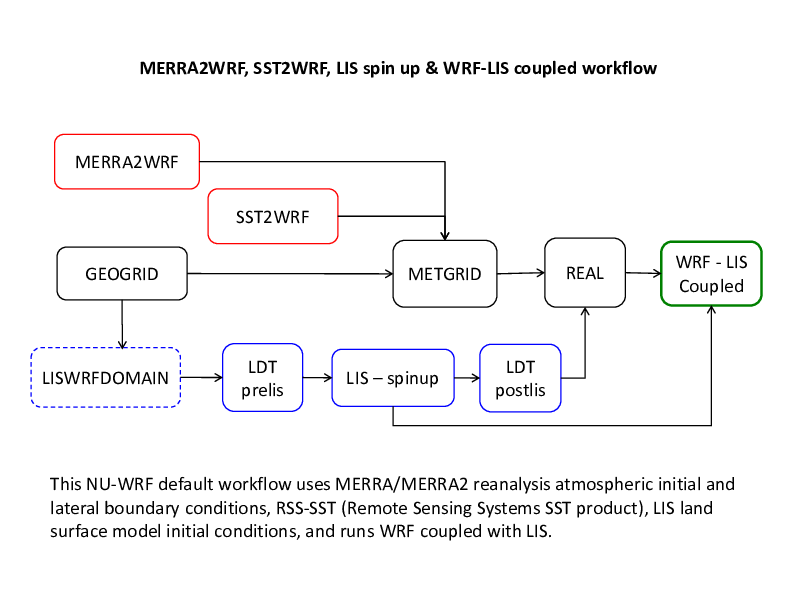
Default Workflow
NU-WRF default workflow.
Required files for default workflow
Copy the following files to RUNDIR:
> export RUNDIR=/discover/nobackup/<my_user_id>/scratch/default_workflow
> cp -r $PROJECTDIR/tutorial/default_workflow/* $RUNDIR

Where:
common.reg : shared script with settings used by other scripts.
*.reg : scripts to run pre-processors and model.
namelist* : namelist files required by executables.
Note: Unlike the “basic” workflow, we have no ungrib data. The reason is that this workflow uses MERRA2 reanalysis data as the source of the meteorological fields.
Required script changes
> cd $RUNDIR
Use your favorite editor to edit common.reg and change the values of NUWRFDIR and RUNDIR using the values set earlier.
# *** Please make sure these settings are correct ***
# NUWRFDIR specifies the location of the NU-WRF source code
NUWRFDIR=<CHANGE THIS>
# RUNDIR specifies the location of the temporary run directory
RUNDIR=<CHANGE THIS>
You may need to edit all the *.reg files’ account information and other settings. However, if you belong to group s0492 then the scripts should work without any modifications.
Change account to appropriate SBU charge code:
#SBATCH --account s0942
ntasks is  the number of nodes, -mil runs on Milan nodes:
#SBATCH --ntasks=16 --constraint=mil
Uncomment and set according to your needs and privileges:
##SBATCH --qos=high
Uncomment (if desired) and substitute your e-mail here:
##SBATCH --mail-user=user@nasa.gov
A note about namelists settings
The length of the simulations is specified in the namelist files:
In namelist.wps the length is determined by start_date and end_date
In namelist.input look for start_ and end_ fields.
The dates in both namelists must be consistent.
The workflow is designed to work as-is. However, if you want to run for different dates:
You must get the corresponding atmospheric data for initial conditions.
Yo may need to modify the namelists. For example in namelist.input, make sure end_day - start_day = run_days.
For any other changes please refer to the user’s guide.
GEOGRID
GEOGRID interpolates static and climatological terrestrial data (land use, albedo, vegetation greenness, etc) to each WRF grid.
Input: namelist.wps
Output: For N domains (max_dom in namelist.wps), N geo_em files will be created.
Before running GEOGRID ensure your domain is in the right location. To do so run plotgrids_new.ncl (or ./view_geo.reg)
> module load ncl
> cd $RUNDIR
> ncl $NUWRFDIR/WPS/util/plotgrids_new.ncl
This is where you would edit namelist.wps to modify the domain information. Now run GEOGRID:
> cd $RUNDIR
> sbatch geogrid.reg
When done, check for “Successful completion” string in the file geogrid.slurm.out. geogrid.log.nnnn (nnnn is the cpu number) files will also be created for tracking run failures or debugging.
Use of GEOS-5 Meteorological Data
Another source of NU-WRF initial and lateral boundary conditions is NASA’s GEOS-5 global model. A number of dataset options exist from GEOS-5, including archived MERRA and MERRA-2 reanalyses. However, there are some issues to keep in mind. First of all the GEOS-5 land surface data cannot be used to initialize WRF, due to fundamental differences between the GEOS-5 Catchment LSM and those in WRF. Thus, the GEOS-5 data in the current workflow also includes WRF-LIS. Second, GEOS-5 writes output in netCDF (and historically HDF4 and HDFEOS2) instead of GRIB. And furthermore, GEOS-5 often does not output all the variables expected by WPS. To address these issues, special preprocessing software has been developed: MERRA2WRF. MERRA2WRF is a program customized to process the 6-hourly reanalyses from MERRA and MERRA-2. For 3-hourly MERRA-2 processing users must fall back to GEOS2WRF, which is not discussed here.
MERRA2WRF
> cd $RUNDIR
> ./merra2wrf.reg  # Not a batch script. It may take a minute or two to complete...

Note that the script downloads data with start date = 20150711 and end date = 20150712.

> cp $RUNDIR/data/merra2wrf/MERRA* $RUNDIR
SST2WRF
SST2WRF processes several sea surface temperature (SST) products produced by Remote Sensing Systems (RSS; see http://www.remss.com).
To run:
> cd $RUNDIR
> ./sst2wrf.reg  # Not a batch script. It may take a few seconds to complete...

Note that the script downloads data with start date = 20150711 and end date = 20150712.

When done, SSTRSS* files will be created in the $RUNDIR/data/mw/ directory. These files must be copied to $RUNDIR before running the METGRID component.

> cp $RUNDIR/data/mw/SSTRSS* $RUNDIR
METGRID
METGRID horizontally interpolates MERRA and SSTRSS data to the WRF domains, and combines them with the output from GEOGRID.
Input: namelist.wps, MERRA*, SSTRSS* and geo_em* files.
Output: Several met_em* files corresponding to the number of intervals (interval_seconds) in simulation length (start/end dates).
To run:
> cd $RUNDIR
> sbatch metgrid.reg
When done, check for “Successful completion” string in the file metgrid.slurm.out. metgrid.log.nnnn (nnnn is the cpu number) files also be created for tracking run failures or debugging.
LISWRFDOMAIN (optional step)
LISWRFDOMAIN is used to customize (and check) LDT and LIS config files so their domain(s) (grid size, resolution, and map projection) match that of WRF. It uses the output from GEOGRID to determine the reference latitude and longitude. For this tutorial, we are using pre-defined lis.config.* and ldt.config.* files that do not need to be modified (or checked). However, if you do change your GEOGRID domain then you may need to run LISWRFDOMAIN.
Input: lis.config, ldt.config and geo_em* files.
Output: lis.config, ldt.config (will be identical to original config files if no changes are necessary).
Example:
> cd $RUNDIR
> ./liswrf_domain.reg
Running the script will replace, if necessary, the original files with the “new” ones before running LDT, thus ensuring that the domain parameters between LIS and WRF are consistent.
LDT (pre-LIS)
LDT processes data inputs for different surface models. In this use-case we are using the Noah-MP v3.6 land surface model.
Input: ldt.config (ldt.config.prelis gets copied into ldt.config by ldt_prelis.reg )
Output: lis_input* files for each NU-WRF domain.
To run:
> cd $RUNDIR
> sbatch ldt_prelis.reg

When done, check for "Finished LDT run" string in the file ldtlog_pt.0000
LIS
LIS can be run in various modes. Here we run in “retrospective” mode (a very short LIS spin-up) to produce restart and history files. LDT postlis use the history files and the restart files are used by WRF.
Input: lis_input* files for each NU-WRF domain (this is the output from LDT pre-LIS), lis.config.coldstart, forcing_variables_merra2.txt, NOAHMP36_OUTPUT_LIST_SPINUP.TBL
Output: surface model output in the OUTPUT/SURFACEMODEL/2015 directory.
To run:
> cd $RUNDIR
> sbatch lis.reg

When done, lis.reg copies the LIS restart/history files in OUTPUT to $RUNDIR
Check this file for successful run completion: lis.slurm.out
lislog.nnnn files will also be created for tracking run failures or debugging.
For more information about LIS see https://lis.gsfc.nasa.gov/.
LDT (post-LIS)
After running LIS, it is necessary to rerun LDT in “NUWRF preprocessing for real” mode. This requires modifications to ldt.config to specify the static output file from LDT and the dynamic output file from LIS. Fields from both will be combined and written to a new netCDF output file for use by REAL
Input: ldt.config (ldt.config.postlis gets copied into ldt.config by ldt_postlis.reg ), LIS history files in OUTPUT directory.
Output: lis4real_input* files for each NU-WRF domain.
To run:
> cd $RUNDIR
> sbatch ldt_postlis.reg

When done, check for "Finished LDT run" string in the file ldt_log_postlis.0000
REAL
REAL vertically interpolates the METGRID output to the WRF grid, and creates initial and lateral boundary condition files.
Input: namelist.input.real, met_em* files, geo_em*, lis4real_input* files.
Output: wrfinput* files (one for each domain), wrfbdy_d01.
To run:
> cd $RUNDIR
> sbatch real.reg
Check real.slurm.out for run completion. If necessary check the real_logs directory for real.rsl.out.nnnn and real.rsl.error.nnnn files.
WRF
Input: namelist.input.wrf, lis.config.wrf, NOAHMP36_OUTPUT_LIST.TBL wrfinput* files (one for each domain), wrfbdy_d01.
Output: wrfout* files (one for each domain).
To run:
> cd $RUNDIR
> sbatch wrf.reg
Check wrf.slurm.out for run completion. If necessary check the wrf_logs directory for wrf.rsl.out.nnnn and wrf.rsl.error.nnnn files.
Post-processing on Discover
Using NCVIEW:
> module load ncview
> ncview <filename>
Post-processing on Discover
Using RIP (NCAR graphics). Submit the rip job:
> cd $RUNDIR
> ./rip.bash # (or use sbatch)
> idt filename.cgm # Substitute actual filename

rip.bash will run ripdp_wrfarw and rip to generate NCAR Graphics cgm files.
idt is a NCAR Graphics executable in $NCARG_ROOT/bin - where $NCARG_ROOT is

$PROJECTDIR/lib/sles12/ekman/intel-intelmpi/ncarg

Sample RIP plot specification tables are in $NUWRFDIR/scripts/rip and are looped through by rip.bash

See http://www2.mmm.ucar.edu/wrf/users/docs/ripug.htm for info on customizing plots with RIP.
Minor changes to rip.bash may be necessary.
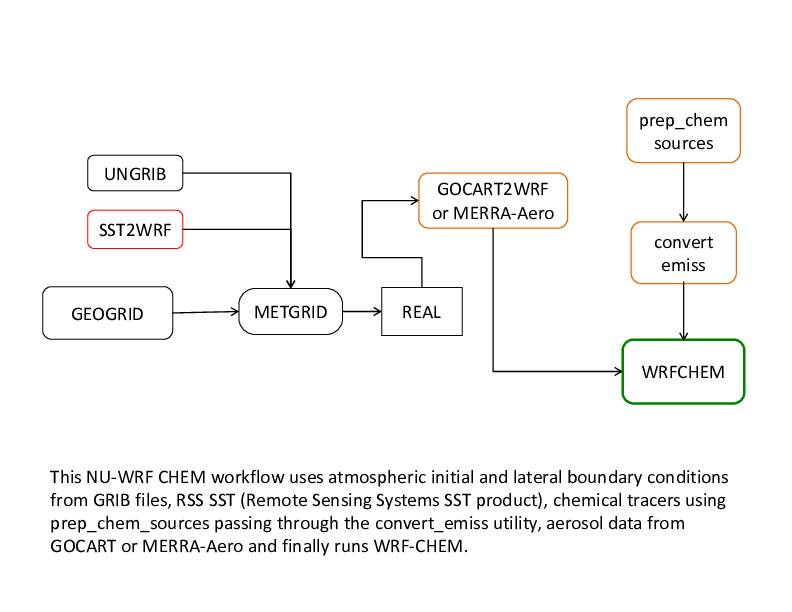
Chemistry Workflow
offline GOCART
on-line GOCART from GEOS5
MERRAero reanalyses
MERRA-2
NU-WRF chemistry workflow.
Required files for chemistry workflow
Copy the following files to RUNDIR:
> export RUNDIR=/discover/nobackup/<my_user_id>/scratch/chemistry_workflow
> cp -r $PROJECTDIR/tutorial/chemistry_workflow/* $RUNDIR

Where:
common.reg : shared script with settings used by other scripts.
*.reg : scripts to run pre-processors and model.
namelist* : namelist files required by executables.
data/ungrib : GRIB atmospheric data for initial conditions used by UNGRIB component.
data/gocart : data files used by GOCART
Required script changes
> cd $RUNDIR
Use your favorite editor to edit common.reg and change the values of NUWRFDIR and RUNDIR using the values set earlier.
# *** Please make sure these settings are correct ***
# NUWRFDIR specifies the location of the NU-WRF source code
NUWRFDIR=<CHANGE THIS>
# RUNDIR specifies the location of the temporary run directory
RUNDIR=<CHANGE THIS>
You may need to edit all the .reg files’ account information and other settings. However, if you belong to group s0492 then the scripts should work without any modifications.
Change account to appropriate SBU charge code:
#SBATCH --account s0942
ntasks is  the number of nodes, -mil runs on Milan nodes:
#SBATCH --ntasks=16 --constraint=mil
Uncomment and set according to your needs and privileges:
##SBATCH --qos=high
Uncomment (if desired) and substitute your e-mail here:
##SBATCH --mail-user=user@nasa.gov
A note about namelists settings
The length of the simulations is specified in the namelist files:
In namelist.wps the length is determined by start_date and end_date
In namelist.input look for start_ and end_ fields.
The dates in both namelists must be consistent.
The workflow is designed to work as-is. However, if you want to run for different dates:
You must get the corresponding atmospheric data for initial conditions.
You may need to modify the namelists. For example in namelist.input, make sure end_day - start_day = run_days.
For any other changes please refer to the user’s guide.
GEOGRID
GEOGRID interpolates static and climatological terrestrial data (land use, albedo, vegetation greenness, etc) to each WRF grid.
Input: namelist.wps
Output: For N domains (max_dom in namelist.wps), N geo_em files will be created.
Before running GEOGRID ensure your domain is in the right location. To do so run plotgrids_new.ncl
> module load ncl
> ncl $NUWRFDIR/WPS/util/plotgrids_new.ncl
This is where you would edit namelist.wps to modify the domain information. Now run GEOGRID:
> cd $RUNDIR
> sbatch geogrid.reg
When done, check for the “Successful completion” string in the file geogrid.slurm.out. geogrid.log.nnnn (nnnn is the cpu number) files will also be created for tracking run failures or debugging.
UNGRIB
UNGRIB unpacks GRIB1 or GRIB2 files that contain meteorological data (soil moisture, soil temperature, sea surface temperature, sea ice, etc) and writes specific fields in a WPS intermediate format.
Input: namelist.wps and GRIB input data.
Output: Several GFS* files corresponding to the number of intervals (interval_seconds) in simulation length (start/end dates).
Notes:
- The GRIB input is referenced in the run script, ungrib.reg: ./link_grib.csh data/ungrib/gfs*
The UNGRIB output (GFS) is determined by the settings in the WPS namelist (namelist.wps).
makes use of Vtables that list the fields and their GRIB codes that must be unpacked from the GRIB files.
To run:
> cd $RUNDIR
> ./ungrib.reg
When done, check for “Successful completion” string in file ungrib_logs/ungrib.log.
METGRID
METGRID horizontally interpolates UNGRIB and SSTRSS output to the WRF domains, and combines them with the output from GEOGRID.
Input: namelist.wps, geo_em*, NAM*, and SSTRSS* files.
Output: Several met_em* files corresponding to the number of intervals (interval_seconds) in simulation length (start/end dates).
To run:
> cd $RUNDIR
> sbatch metgrid.reg
When done, check for the “Successful completion” string in the file metgrid.slurm.out. metgrid.log.nnnn (nnnn is the cpu number) files also be created for tracking run failures or debugging.
REAL
REAL vertically interpolates the METGRID output to the WRF grid, and creates initial and lateral boundary condition files.
Input: namelist.input, met_em* files, geo_em* files.
Output: wrfinput* files (one for each domain), wrfbdy_d01.
To run:
> cd $RUNDIR
> sbatch real.reg
Check real.slurm.out for run completion. If necessary check the real_logs directory for real.rsl.out.nnnn and real.rsl.error.nnnn files.
GOCART2WRF
Input: namelist.gocart2wrf, grib_input/*, wrfinput* files (one for each domain), wrfbdy_d01.
Output: wrfinput* files (one for each domain), wrfbdy_d01. Original wrfinput* and wrfbdy_d01 files will be backed up with .gocart2wrf extension.
To run:
> cd $RUNDIR
>./gocart2wrf.reg  # runs in serial
Check this file for successful run completion: gc2wrf.log.
PREP_CHEM_SOURCES
This community tool processes several biogenic, anthropogenic, volcanic, and wildfire emissions. The NU-WRF version has several modifications that are discussed in the user’s guide. Running prep_chem_sources requires a prep_chem_sources.inp file and upon completion, it produces map projection data (that can be visualized by plot_chem) as well as other files used by convert_emiss.
Input: prep_chem_sources.inp
Output: nuwrf-T* files
To run:
> cd $RUNDIR
> ./prep_chem_sources.reg   # runs in serial
Check this file for successful run completion: pcs.log.
Convert_Emiss
This is a community WRF-Chem preprocessor that takes the output from PREP CHEM SOURCES and rewrites the fields in new netCDF files for reading by WRF-Chem.
Input: namelist.input.convert_emiss files (one for each domain).
Output: wrfchemi_gocart_bg* and wrfchemi* files (one for each domain).
To run:
> cd $RUNDIR
> sbatch convert_emiss.reg
Check ce.slurm.out for run completion.
WRF
If we get to this point then we are ready to run WRF with chemistry.
Input: namelist.input, wrfinput* files (one for each domain), wrfbdy_d01, wrfchemi_gocart_bg* and wrfchemi* files.
Output: wrfout* files (one for each domain).
To run:
> cd $RUNDIR
> sbatch wrf.reg
Check wrf.slurm.out for run completion. If necessary check the wrf_logs directory for wrf.rsl.out.nnnn and wrf.rsl.error.nnnn files.
Post-processing on Discover
Using NCVIEW:
> module load ncview
> ncview <filename>
Post-processing on Discover
Using RIP (NCAR graphics). Submit the rip job:
> cd $RUNDIR
> ./rip.bash # (or use sbatch)
> idt filename.cgm # Substitute actual filename

rip.bash will run ripdp_wrfarw and rip to generate NCAR Graphics cgm files.
idt is a NCAR Graphics executable in $NCARG_ROOT/bin
Sample RIP plot specification tables are in $NUWRFDIR/scripts/rip and are looped through by rip.bash

See http://www2.mmm.ucar.edu/wrf/users/docs/ripug.htm for info on customizing plots with RIP.
Minor changes to rip.bash may be necessary.
The workflow just described can be modified to use MERRA/ MERRA2 reanalysis atmospheric initial and lateral boundary conditions, RSS SST (Remote Sensing Sytems SST product) along with LIS land surface model initial conditions (see diagram on the next page). Just replace the UNGRIB step with the MERRA2WRF step and add the LDT-LIS-LDT steps before running REAL.
Alternate NU-WRF chemistry workflow.

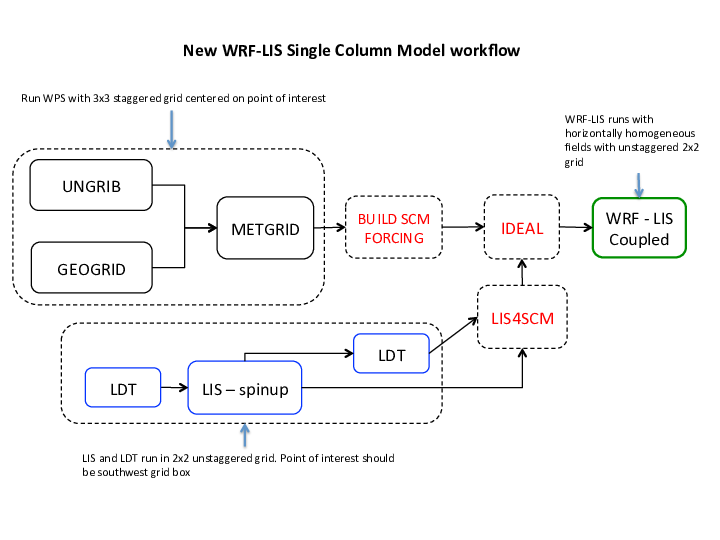
SCM Workflow
NU-WRF Single Column Model (SCM) workflow.
Required files for SCM workflow
Copy the following files to RUNDIR:
> export RUNDIR=/discover/nobackup/<my_user_id>/scratch/scm_workflow
> cp -r $PROJECTDIR/tutorial/scm_workflow $RUNDIR

Where:
common.reg : shared script with settings used by other scripts.
*.reg : scripts to run pre-processors and model.
namelist* : namelist files required by executables.
ungrib_input/* : GRIB atmospheric data for initial conditions used by UNGRIB component.
Required script changes
> cd $RUNDIR
Use your favorite editor to edit common.reg and change the values of NUWRFDIR and RUNDIR using the values set earlier.
# *** Please make sure these settings are correct ***
# NUWRFDIR specifies the location of the NU-WRF source code
NUWRFDIR=<CHANGE THIS>
# RUNDIR specifies the location of the temporary run directory
RUNDIR=<CHANGE THIS>
You may need to edit all the .reg files’ account information and other settings. However, if you belong to group s0492 then the scripts should work without any modifications.
Change account to appropriate SBU charge code:
#SBATCH --account s0942
Change if you want to change number of nodes, hasw - to run on haswell nodes:
#SBATCH --ntasks=16 --constraint=hasw
Uncomment and set according to your needs and privileges:
##SBATCH --qos=high
Uncomment (if desired) and substitute your e-mail here:
##SBATCH --mail-user=user@nasa.gov
A note about namelists settings
The length of the simulations is specified in the namelist files:
In namelist.wps the length is determined by start_date and end_date
In namelist.input look for start_ and end_ fields.
The dates in both namelists must be consistent.
The workflow is designed to work as-is. However, if you want to run for different dates:
You must get the corresponding atmospheric data for initial conditions.
Yo may need to modify the namelists. For example in namelist.input, make sure end_day - start_day = run_days.
For any other changes please refer to the user’s guide.
GEOGRID
GEOGRID interpolates static and climatological terrestrial data (land use, albedo, vegetation greenness, etc) to each WRF grid.
Input: namelist.wps
Output: For N domains (max_dom in namelist.wps), N geo_em files will be created.
To run GEOGRID:
> cd $RUNDIR
> sbatch geogrid.reg
When done, check for “Successful completion” string in the file geogrid.slurm.out. geogrid.log file will also be created which can be used for tracking run failures or debugging.
UNGRIB
UNGRIB reads GRIB or GRIB2 files with dynamic meteorological and dynamic terrestrial data (soil moisture, soil temperature, sea surface temperature, sea ice, etc) and writes specific fields in a WPS intermediate format.
Input: namelist.wps, ungrib_input/* files.
Output: NARR* files.
NOTE: The GRIB input is referenced in the run script, run_ungrib.bash: ./link_grib.csh ungrib_input/* The UNGRIB output (NARR) is determined by the settings in the WPS namelist (namelist.wps).
To run:
> cd $RUNDIR
> ./ungrib.reg
When done, check for “Successful completion” string in the file ungrib.slurm.out. ungrib.log will also be created for tracking run failures or debugging.
METGRID
METGRID horizontally interpolates the output from UNGRIB to the WRF domains, and combines it with the output from GEOGRID.
Input: namelist.wps, NARR* files, geo_em* files.
Output: Several met_em* files corresponding to number of intervals (interval_seconds) in simulation length (start/end dates).
To run:
> cd $RUNDIR
> sbatch metgrid.reg
When done, check for “Successful completion” string in the file metgrid.slurm.out. metgrid.log.nnnn (nnnn is the cpu number) files also be created for tracking run failures or debugging.
BUILD_SCM_FORCING
Input: WPS output, forcing_file.cdl and several *.ncl files.
Output: profile_init.txt, surface_init.txt, and a directory, 2006-07-14_00:00:00, containing forcing_file.nc and input_sounding data.
To run:
> cd $RUNDIR

Edit build_scm_forcing.bash: set metPath and forceArcRoot equal to RUNDIR value.

> ./build_scm_forcing.bash # runs in serial
After some other “messages” you should see “SUCCESS” printed on the terminal.
LDT (pre-LIS)
LDT processes data inputs for different surface models. In this use-case we are using the Noah v3.6 land surface model.
Input: ldt.config
Output: lis_input* files for each NU-WRF domain.
To run:
> cd $RUNDIR
> sbatch ldt_prelis.reg

When done, check for "Finished LDT run" string in the file ldt_log_prelis.0000
LIS
LIS can be run from a cold start or from a restart. A cold start run is usually a multi-year simulation, not appropriate for a tutorial - though one can concoct a short spin up run for demo purposes. In the restart case we have to provide restart files as input (LIS_RST* files) and the LIS run can be significantly shorter. Nevertheless, the restart (and history) files have already been generated for this tutorial and the user can skip this step. If you want to run a LIS spin up for this case you may look at the default workflow and use those scripts and config files as a template.
LDT (post-LIS)
After running LIS, it is necessary to rerun LDT in “NUWRF preprocessing for real” mode. This requires modifications to ldt.config to specify the static output file from LDT and the dynamic output file from LIS. Fields from both will be combined and written to a new netCDF output file for use by REAL
Input: ldt.config
Output: lis4real_input* files for each NU-WRF domain.
To run:
> cd $RUNDIR
> sbatch ldt_postlis.reg

When done, check for "Finished LDT run" string in the file ldt_log_postlis.0000
LIS4SCM
LIS4SCM copies data from southwest grid point to remainder of LIS/LDT domain (becomes horizontally homogenous): LIS4SCM imposes identical lat/lon at each LIS point in the restart file.
Input: namelist.lis4scm, LDT-LIS-LDT output
Output: Horizontally homogeneous lis_input file (lis_input.d01.nc)
To run:
> cd $RUNDIR
> ./lis4scm.reg   # Note this runs in serial
IDEAL
IDEAL creates wrfinput file from text column data and homogeneous LIS/LDT file.
Input: LIS4SCM output
Output: wrfinput file (wrfinput_d01).
To run:
> cd $RUNDIR
> sbatch ideal.reg
WRF-LIS
WRF-LIS reads wrfinput and the homogenous LIS restart file.
Input: wrfinput file
Output: wrfoutput file.
To run:
> cd $RUNDIR
> sbatch wrf.reg
Notes:
Tested case uses periodic LBCs (thus, no wrfbdy file).
Tested case also used no forcing (no external advection, etc).
Tested case used dx = 1 km, dt = 6 sec (runs very fast!)
Post-processing on Discover
Using NCVIEW:
> module load ncview
> ncview <filename>
Post-processing on Discover
Using RIP (NCAR graphics). Submit the rip job:
> cd $RUNDIR
> ./rip.bash # (or use sbatch)
> idt filename.cgm # Substitute actual filename

rip.bash will run ripdp_wrfarw and rip to generate NCAR Graphics cgm files.
idt is a NCAR Graphics executable in $NCARG_ROOT/bin
Sample RIP plot specification tables are in $NUWRFDIR/scripts/rip and are looped through by rip.bash

See http://www2.mmm.ucar.edu/wrf/users/docs/ripug.htm for info on customizing plots with RIP.
Minor changes to rip.bash may be necessary.
Regression testing
Definition
From Wikipedia:
Regression testing is a type of software testing that verifies that
software previously developed and tested still performs correctly
even after it was changed or interfaced with other software.
Changes may include software enhancements, patches,
configuration changes, etc. During regression testing, new
software bugs or regressions may be uncovered.
Testing types
Software testing can be roughly divided into three categories:
Automated regression tests. These tests compile and run a very large number of model configurations and may perform various checks.
Manual/user testing. These tests are intended to be performed by users who wish to verify their changes prior to pushing to a central repository. In detail, these tests are similar to automated tests but are more easily executed from the command line.
Unit tests. These tests execute extremely quickly and provide a finer-grained verification than the other regression tests, albeit with far less coverage of the source code. Unit tests do not form part of the NU-WRF code base at this time.
In this section, we discuss the available NU-WRF regression testing infrastructure and how it can be used to perform automated and manual tests.
NU-WRF regression testing scripts
NU-WRF regression testing scripts
Workflows revisited
In this document, we have discussed 4 workflows: basic,
default,  chemistry, and scm. For the purposes of regression
testing  workflows are categorized as follows:

   wrf: default WRF-ARW runs (without LIS) (basic)
   wrflis: like wrf but with LIS-coupling (default and scm)
   chem: like wrf with chemistry (chemistry)
   kpp: like wrf with chemistry - uses KPP

This distinction is necessary to specify test cases in
the configuration file. For a list of all supported NU-WRF
configurations see:

$NUWRFDIR/scripts/python/regression/master.cfg
Python scripts
The python scripts are the following:
reg : Main driver.
RegPool.py : A class with functionality to parallelize tasks.
regression.py : A driver script to execute the NU-WRF component tasks.
RegRuns.py : A class that defines regression test run instances.
RegTest.py : A class that defines regression test instances.
reg_tools.py : Various tools used by the main drivers.
shared/utils.py : Various utilities used by all the scripts.
The scripts can be used to perform both automated regression tests as well as “manual testing”.
Manual testing
Before running the regression testing scripts make sure you duplicate the sample.cfg file and customize it to your needs. When ready to run the scripts, specify the configuration file name as an argument to reg and wait for the results:
$ cd $NUWRFDIR/scripts/python/regression

To run the scripts, specify the configuration file name as an
argument to reg:

$ reg <cfg_file> &

Note that the configuration file name extension should
not be specified.
Manual testing
Upon execution, you will see some messages echoed to STDOUT
but all the output will be logged to a file named
<cfg_file>.LOG.

There will be other "log" files, one for each  <workflow> and
one for  each <experiment>, that will be generated for each
'reg' run.

Workflow builds, a maximum of four, will be generated in
  <scratch_dir>/builds

Each build will have its own make.log as well as <workflow>.out
and <workflow>.err files that will be useful to diagnose
build /run errors.
Manual testing
Run logs will be generated in each run directory under
<scratch_dir>/results.
These will have the name <experiment>-regression.log
and should also be very useful in diagnosing test-case-specific
run-time issues.

At the end of a "reg" an email test report will be emailed to
the recipient specified in the mail_to field in USERCONFIG.

Note that all 'reg' runs are tagged with a unique time stamp
corresponding to the date/time the run was executed.
Manual testing within interactive queue
One can run NU-WRF test cases interactively. To do so make sure you set use_batch=no in your configuration file. Also, if running interactively, one can only use one compiler option; i.e. in the ’compilers’ setting you can only use intel-sgimpt or gnu-openmpi. With those caveats in mind: Request an interactive queue on DISCOVER, for example:
> salloc --ntasks=84 --time=1:00:00 --account=s0492 --constraint=mil
Once you get the prompt
$ cd $NUWRFDIR/scripts/python/regression
$ reg <cfg_file> &
Note that the extension should not be specified.